Retro computing with a touch of modern and the home for all things, retroCombs (aka Steven Combs).
Disclosure Statement: When you click on links to various merchants on this site and make a purchase, this can result in this site earning a commission. Affiliate programs and affiliations include, but are not limited to Amazon, the eBay Partner Network, and/or others.
HOWTO: Program C.H.I.P. with Python to control LED
by Steven B. Combs, Ph.D.
The C.H.I.P. packs a lot of power into a tiny board that includes both Bluetooth and Wi-Fi. It’s the perfect combination of small size and performance to power physical computing projects.
I recently built a tracked robotic platform, shown in the image below, for a physical computing presentation. My platform uses an Arduino; however the Arduino is too large, has limited capabilities, and does not include Bluetooth and Wi-Fi. The C.H.I.P. corrects these deficiencies and is half the cost of the Arduino. The C.H.I.P. seems perfect for this project.

My goal for this post is to configure a C.H.I.P. so it can serve as the brain for my tracked robotic platform. I will install a complete Python GPIO development environment on the C.H.I.P. To test the environment, I will connect an LED to the GPIO pins and create two Python programs to turn an LED on and off.
Table of Contents
- Flash the C.H.I.P. without a GUI
- Connect C.H.I.P. to network
- Set the locale
- Set timezone
- Install Git
- Install Python
- Install the Python GPIO Library
- Connect LED to the C.H.I.P.
- Turn the LED on
- Turn the LED off
- Hello World
Flash the C.H.I.P. without a GUI
A graphical user interface is not needed. My flash the C.H.I.P. post provides instructions to flash the C.H.I.P. Choose the latest (v4.4 as of this writing) headless image to flash.
Connect C.H.I.P. to network
My flash the C.H.I.P. post demonstrates how to add the C.H.I.P. to a network so you can connect via SSH.
Alternatively: Use a USB-OTG serial connection, instructions found in the flash the C.H.I.P. post, without the need to connect the C.H.I.P. to a network.
Set the locale
Use the Terminal command below to set the locale of the chip to ensure keyboard commands are geographically correct:
sudo apt-get update && sudo apt-get install locales && sudo dpkg-reconfigure locales && sudo locale-gen
Set timezone
Use the command below to set the time zone to ensure the onboard clock is accurate:
sudo dpkg-reconfigure tzdata
This is important if you use time-based Python event programming.
Install Git
The Python GPIO library requires Git. Use the command below to install Git:
sudo apt install git
Learn what Git can do. It is a valuable tool to use when programming.
Install Python
Use the command below to install the Python programming language:
sudo apt install python
Install the Python GPIO Library
Python on the C.H.I.P. requires a library to address and provide access to the GPIO pins. Use the library and instructions (also found below) from the GitHub site below:
https://github.com/xtacocorex/CHIP_IO
Optional: Before you begin the lengthy commands below, I recommend you replace the default
bashshell with thefishshell. You can find more information on my fish and C.H.I.P.s post.
Use the commands below to install the Python library:
sudo apt update
sudo apt install git build-essential python-dev python-pip flex bison -y
git clone https://github.com/atenart/dtc
cd dtc
make
sudo make install PREFIX=/usr
cd ..
git clone git://github.com/xtacocorex/CHIP_IO.git
cd CHIP_IO
sudo python setup.py install
cd ..
sudo rm -rf CHIP_IO
To use the GPIO library and access the pins, include the Python import command below at the beginning of your program:
import CHIP_IO.GPIO as GPIO
Similar to GPIO use on a Raspberry Pi, configure GPIO connections as inputs or outputs. This is done within the Python code. I will share the code after I attach an LED to the C.H.I.P.
Connect LED to the C.H.I.P.
Connect the LED to GPIO pins labeled CSID0 and GND as shown in the image below. You will note that I have an inline 1K ohm resistor to protect the LED, GPIOs and C.H.I.P.
WARNING: Please read this warning from fordsfords on the Next Thing Co. BBS. He correctly notes that originally I did not include an inline 1 to 10K resistor. The particular LED I use has a high internal resistance (to protect the GPIO from burn out) and is an LED I use for this type of experimentation frequently. While not required, I made an update to this post and the image to include an inline 1K ohm resistor as a safety buffer.
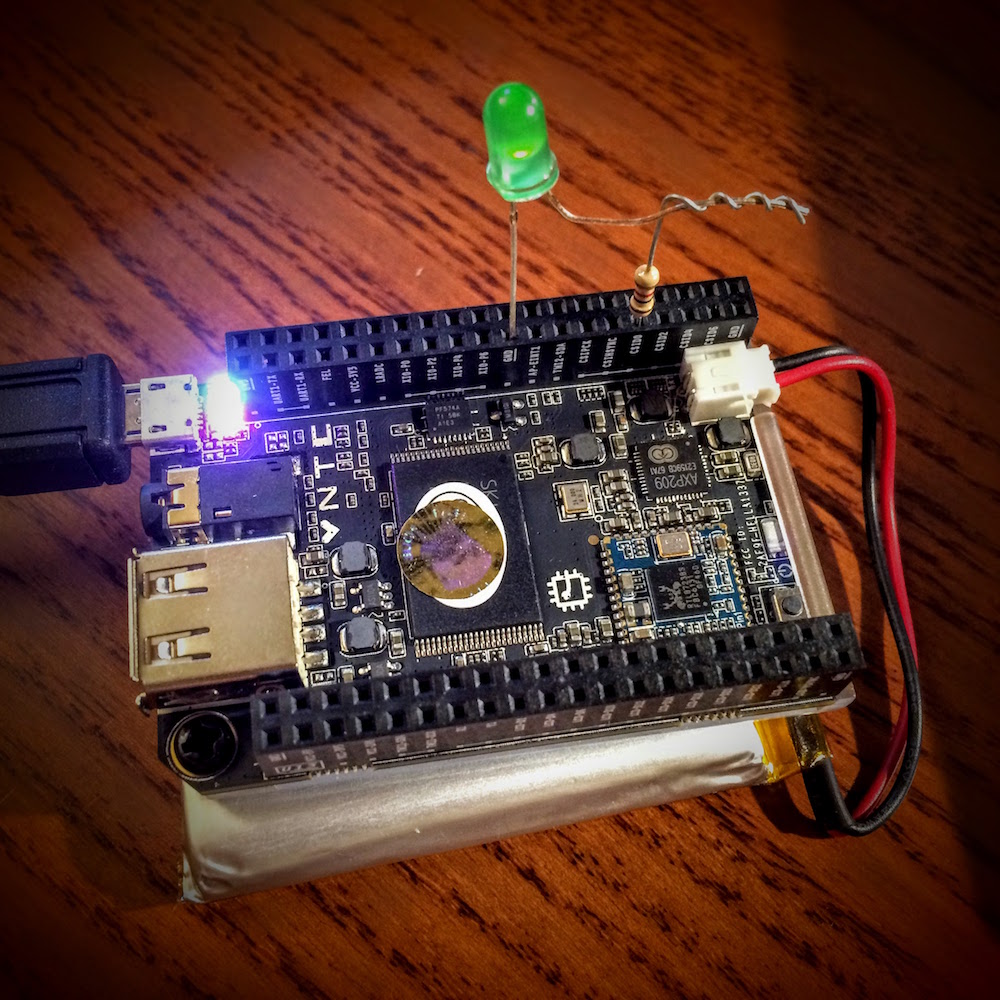
Connect the LED long wire (anode - positive) to the resistor and then to GPIO pin CSID0.
Connect and the short wire (cathode - negative) to GPIO pin GND.
If you don’t have LEDs, I recommend this batch from Amazon or stop by your local Radio Shack.
Turn the LED on
Now the fun begins. Create a Python program on the C.H.I.P. to the LED on.
Ensure there is still an SSH or Serial connection to the C.H.I.P.
Type the following:
nano led-csid0-on.py
The nano editor will load a blank page.
Enter the code below into the nano editor:
import CHIP_IO.GPIO as GPIO     #import the GPIO library
GPIO.setup("CSID0", GPIO.OUT)   #set CSID0 as an output
GPIO.output("CSID0", GPIO.HIGH) #set CSID0 (LED) HIGH (On)
I include comments (after the # character) that are not necessary.
To save the code on the C.H.I.P. and exit the nano editor, tap: control + x
The nano editor will prompt you to save the code as shown in the image below.
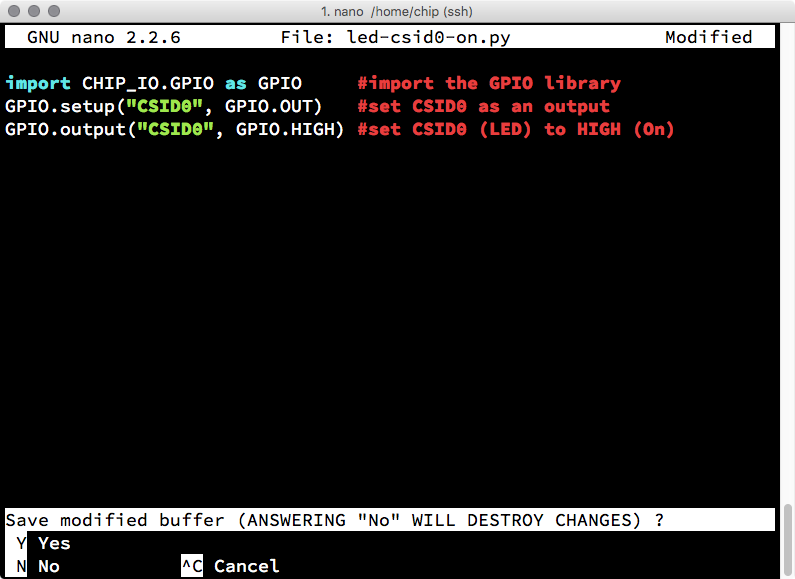
Press y followed by ↩ to save the code and exit the editor. The Python code is now on the C.H.I.P. Time to give it try.
Use the command below to execute the Python program to turn the LED off:
sudo python led-csid0-on.py
If the [sudo] password for chip: prompt appears, enter the default: chip
If all goes well (and I didn’t fat-finger any of the instructions) the LED will light up! If it didn’t turn on, troubleshoot the following:
- Is the LED connected properly?
- Is the Python program correct?
- Did you use the correct command to run the program?
- Did you include
sudoat the beginning of the command (this is required)? - Did you receive any errors after running the Python program assist with problem resolution?
Now we need to turn off the LED. Don’t unplug the LED or reboot the C.H.I.P. We will repeat the instructions in this step and create a Python program to the LED off.
Turn the LED off
With the current SSH or serial connection, type the following:
nano led-csid0-off.py
The nano editor will load a blank page.
Enter the code below into the nano editor. Again, you can exclude comments.
import CHIP_IO.GPIO as GPIO      #import the GPIO library
GPIO.setup("CSID0", GPIO.OUT)    #set CSID0 as an output
GPIO.output("CSID0", GPIO.LOW)   #set CSID0 (LED) LOW (OFF)
To save the code to the C.H.I.P. type: control + x
The nano editor will prompt you to save the code. Press y followed by ↩ to save the code and exit the editor. The Python code is now on the C.H.I.P.
Let’s see if we can turn the LED off. Use the command below to turn the LED off:
sudo python led-csid0-off.py
If the [sudo] password for chip: prompt appears (and it may not this time), enter the default: chip
The LED will turn off. It did turn off, right? If not, follow the troubleshooting steps in the Turn the LED on section above.
Hello World
The Python code above is the physical computing equivalent to the popular “hello world” programs found in beginning programming classes and tutorials. The difference is that we use an LED connected to the C.H.I.P. as our output instead of words on the screen.
In other words, you now have the basics necessary to begin experiments with Python and the GPIO pins on the C.H.I.P. The physical computing world is now just an idea away. What will you create with your GPIO pins active? Drop a comment below and let me know.